Southern Hearted
  • Home
  • Bumbling Thoughts
  • My Kitchen
  • Waste Not
  • Contact

Waste Not Want Not

A few ideas to use all you have.

Another Day, Another Stain

5/14/2019

0 Comments

 
Picture
   My sweet husband and the rest of these clothing criminals I live with but especially my husband can create new stains you cannot wrap you mind around. You will stand there in the laundry room or over a hamper just shaking your head. You try to think of some scenario that could have possibly created this new monstrosity and wonder if disposable clothes in a new business venture that could skyrocket. My very favorite are the ones that have been sitting for a week just marinating and laughing at me as they sink deeper into the particles of the threads. I have used every stain remover on the market and not one works as well as some old fashioned basics and a couple of genius preemptive measures I take to assure I can take out anything short of permanent markers. Throw those ugly little markers in the trash and give them Crayola invisible markers since they can't act any better. Today I just wanted to list three tips you can use to take just about anything out and help save some scrubbing and ranting before it even happens. If this doesn't work then let's discuss those disposable garments or wrapping them in Saran Wrap.
  • First off, Spray every clothing item that comes into your home with Scotchgard. Re spray every three months if it is a heavy use item. This helps more than anything else I have tried. Trust me, if you even let them hold it up to look at it once it gets home, they will stain it somehow. I'm right and you know it!
  • Now, you walk in and the five year old has had a bloody nose while eating a chocolate bar and your husband just came over to help but he was having BBQ. We now have a trifecta of stains and you are in a whirl of hiss fit you can't get out of and figure you'll just throw it out. Well don't. Get out your economy size bottle of Hydrogen Peroxide and drench that shirt in it. Let it sit for ten minutes, throw is in the wash on hot (no matter what darn color it is) and let it run. I have used this method with all of these and lipstick, foundation make up, motor oil, cooking oil, paint, and rust. But this in oil drum size as often as needed.
  • I'm going to share this one because it makes sense but has the least amount of a chance of success because it depends on said laundry criminals to do something to help. Place a bottle of Shout stain remover in each hamper. I know, this is a waste of time. These people do not have the where with all for this sort of forward thinking. Who are we kidding...
  • These same people are going to beat your towels to death until they are flat and grimy causing you to wonder if they use soap when they bathe. We have all heard about using vinegar and baking soda. This does work very well but I find it leaves the towels stiff as well. To revive that fluff after this process, I will run them through an additional rinse cycle with Downy Original softener but also 10 drops of lavender oil. When the washer fills up and the softener and oil are mixed into the towels well, shut the washer off for an extended soak for an hour. Finish the cycle and dry the towels. 
  • Lastly, Hang dry your clothes if you can. This has nothing to do with stains but it will extend the life of your clothes more than you think. 
#southernhearted
#laundrystains
​#wastenotwantnot

​


0 Comments

Apricot Jam

4/30/2013

0 Comments

 
Picture
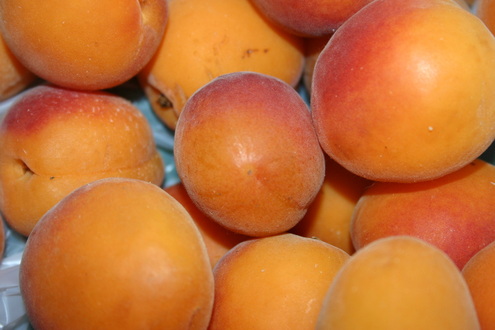
    So you have a apricot tree or know someone with a box or two extra of these divine little fruits. Here's a pectin free jam I make with apricots and a lot of other fruits. My favorite way to make this jam is in a kitchen full of friends and a pitcher of iced tea or coffee. It gets hot in there and there is always at least one goof up but we have a great time. I love this recipe for it's ease so beginners, just dive in. The worst thing that is going to happen is that it won't set up (thicken), so what. You'll just have a mess of apricot syrup to give out and you don't have to tell anyone that's an accident. If it still feels daunting, send me an email so I can help. So go on, gather some friends and get to it!

The ingredients

  • 12 Cups of pitted chopped apricots
  • 6 Tablespoons of lemon juice
  • 9 Cups of granulated sugar


The Set Up

  • 15 Mason jars 8oz
  • 15 Bands and lids to fit
  • Canning Funnel
  • Jar Lifter
  • Big pot with a lid preferably or one with a canning rack (I've never used mine, I just put it in the pot for a few minutes).
  • Towel for the table
   When I start to actually make jelly, I set everything up first. You will not have time to set up once you start and I find trying causes some swearing and crying. Better to just be ready to go. Start by spreading a thick towel across a surface that the heat won't damage. Set the lids and rings next to it. Put the pot(and rack if you want) and a large wooden spoon on the stove(burner off of course) for jam ingredients to boil down in. Put your pot for boiling the full jars in on the stove with the jar lifter near it. Lastly but importantly, put some music on and get a pitcher of iced tea to keep you cooled down in what is soon to be a hot kitchen.
  

The Jam

  1. Put a pot of water on to process the full jars in after filling and bring to a slow boil.
  2. Place all of the ingredients in your pot and bring to a boil over medium heat. Stir it CONSTANTLY until the sugar is dissolved. Make sure you really get over bit of it stirred as you go. A thick bottom pot will help keep it from scorching as well.
  3. Then continue to let it boil until it hits the gel stage. Which it when the sticks thickly to a spoon when you dip it into the jelly and hold it up as if to let it run off.
  4. Shut it off and skim all of the foam you can get off from the top of the pot.
  5. Ladle that beautiful jam into the jars leaving a 1/4 inch space at the top.
  6. Clean the rim with a wet cloth
  7. Seal the cap and rings onto the jars.
  8. After you seal them all up, quickly put the jars gently into the pot of slow boiling water for ten minutes.
  9. Lift the jars out of the water and place on the towel.
  10. Listen for that signature pop as they cool so you know they are properly sealed.
  11. Label and decorate your jars as you please then share with the people you love.


Enjoy!

0 Comments

The Life of the Ice Tray

4/30/2013

0 Comments

 
Picture
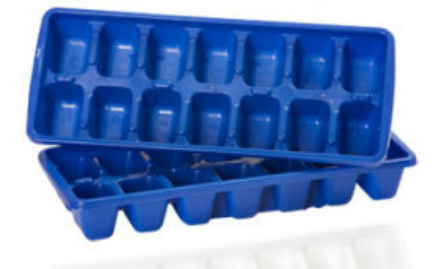
   It's just an ice try right? Simple little thing that most of us leave on the shelf somewhere behind the plastic bowls in a messy cabinet. I've got three actually making ice right now because I just paid three dollars for a bag of it at the store. It just seems odd to spend money on frozen water. So what else can we do with these things? I use them to use up leftover scraps of herbs, citrus and some vegetables that I just can't use up when they are fresh.
 
* When I have to zest and orange or lemon for a recipe I zest the whole thing and then juice it. I put spread the zest into equal squares of the tray and then pour the juice over. Freeze it, put it in a ziplock bag with a label for up to five months.

* When I cook with mushrooms, onions, shallots or garlic I take what is left over after cooking them down and just press it into the squares. You freeze it, ziplock it and label it. there are good for about two months I find.

* Yeast dough for dinner rolls. Make a big batch of dough and let it rise once. Instead of letting it rise again, punch down the dough and press a ball in each square of the tray. Freeze it, ziplock it and label it. These are good for about four months. Simply take them out about noon the day you want to use them, place them in whatever pan you would normally let them do a final rise in and let them rise. Bake as usual. This works great and your family will be so happy that you took the time to make them homemade dinner rolls.

* Leftover simmering sauces? Same thing for them. Cool, tray it, freeze, ziplock and label. These only last about two months but are great for those days when you just need a quick meal.

* Ever have too many eggs? Crack them all into a big measuring cup, scramble them up for every two cups of eggs put in a 1/2 teaspoon of stabilize the yolk. You can then pour into each section of the tray or freeze them in large batches in a plastic bowl. Same as before, freeze, ziplock, label and enjoy for up to six months.

These are just a few ideas to get you started. Start adding up what you aren't throwing out and enjoy the money you save as well as the time you will get back by having something to just grab out of the freezer.

Enjoy!


0 Comments

    Author

    I was brought up with a heavy influence from my grandma Jewel who was from Shubuta, Mississippi. She was the picture of a poor southerner with a big heart and a love of the kitchen and her garden. I have grown into the same sort of woman. I am like a lot of southern rooted women, I live in an unsouthern community. I have found that there are lots of us out there that bring the South to wherever we live.

    Archives

    May 2019
    April 2013

    Categories

    All

    RSS Feed

  • Home
  • Bumbling Thoughts
  • My Kitchen
  • Waste Not
  • Contact